Manage Users⚓︎
Add a new user to PowerBI Portal⚓︎
From the navigation menu, click Users and then User List to access the User Management. From here, you can manage the role of each user, what they have access to, and their unique access code to PowerBI Portal. You can add new users to your organization’s registry either by individually adding them through the platform or importing them in bulk via Excel or from Microsoft Entra ID.

Add a user manually⚓︎
To individually add a new user through the platform, click Add User to open the following screen:
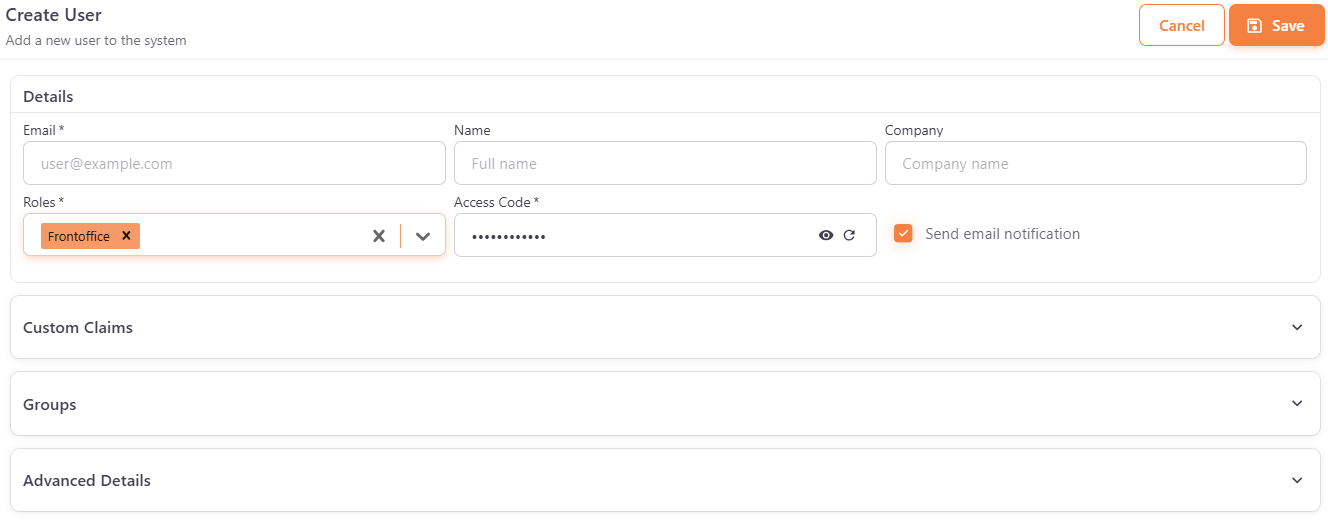
Insert your new user’s email and select at least one role:
- Frontoffice: the user only has access to your organization’s PowerBI Portal’s Reports Viewer.
- Backoffice: the user can add new users with access to the whole Portal, being able to add new reports and manage the access list. They can access the Reports Viewer from the navigation menu.
- Master: has full access to PowerBI Portal, including the settings menu, and can add new users with the Master role.
- Area Manager: the user manages only the reports, files and data hubs of the areas selected in Managed Areas, and can access the Reports Viewer. This role cannot be combined with other roles. See Area Managers.
Optionally, you can also configure the user name and company, associate tags to help filter the user list, and add them to a group. The custom claims section also lets you filter a report or apply row-level security, as explained in Tokens and RLS.
Click the Save button to create the new user.
Info
Access codes are generated automatically for each user.
Import users from Excel⚓︎
Alternatively, you can add new users in bulk via Excel. To do so, from the User list screen, click the Options button on the top right corner of the screen, select Import from Excel, and click Download Template. You’ll find these columns when you open the Excel template: Email, Roles, Name, Company, Send Notification, Tags, Areas, and one column for each custom claim you want to set (the template uses CustomClaimA and CustomClaimB as examples):

Simply paste the list of emails you wish to add and write the role for each one. For users with the Area Manager role, write the names of their managed areas in the Areas column, separated by semicolons. Access codes are generated automatically for each user. Once you’re done, go back to PowerBI Portal, click Browse Files (or drag and drop your filled Excel template), and then click Import to add your new users to the list.
By default, all users added to the PowerBI Portal are notified by email. To prevent this, clear the Send email notification checkbox when creating a user, or set Send Notification to No in the Excel template.
Import users from Microsoft Entra ID⚓︎
You can also import users directly from your Microsoft Entra ID directory.
- From the User list screen, click Options and select Import via Microsoft Entra ID.
- Click Sign in with Microsoft Entra ID and sign in with your Microsoft account.
- Under User Types, choose whether to load Members, External Users, or both.
- Optionally, filter the users by Name, Email, or Group. To filter by group, click Load Groups and select the group. By default, users from all groups are loaded.
- Click Load Users from Microsoft Entra ID. Users that are already registered in PowerBI Portal are not listed. If there are more users to load, click Load More Users.
- Review the list. You can edit each user’s name and company, remove users from the list, and you must select at least one Role for each user. For users with the Area Manager role, click the Managed Areas cell to select their areas. Every user also needs a valid email.
- Click Save. A summary shows how many users were requested and added.
User list actions⚓︎
The Actions column of the User list has the following actions for each user. Some are only available depending on your role and the role of the user.
- Edit: opens the user to change the details described above.
- Delete: removes the user. Confirm the deletion when asked.
- User Access: shows everything the user has access to. For each item, the list shows its Name, the Access type (Report, File, Data Hub, or Playlist), the Group name the access comes from, the Area, and whether the access is Overridden.
- View as: opens PowerBI Portal as that user to validate what they see, as explained in View as Feature.
- Deactivate and Activate: a deactivated user loses access to this environment, and the Status of the user changes to Inactive. Click Activate to give the access back. Confirm the action when asked.
- Resend access code: sends an email to the user with their access code.