Notifications⚓︎
In Settings > Notifications, Master users configure how PowerBI Portal sends emails and customize the content of each notification. The tab has two sections: Email Configuration and Notification Types.
Email Configuration⚓︎
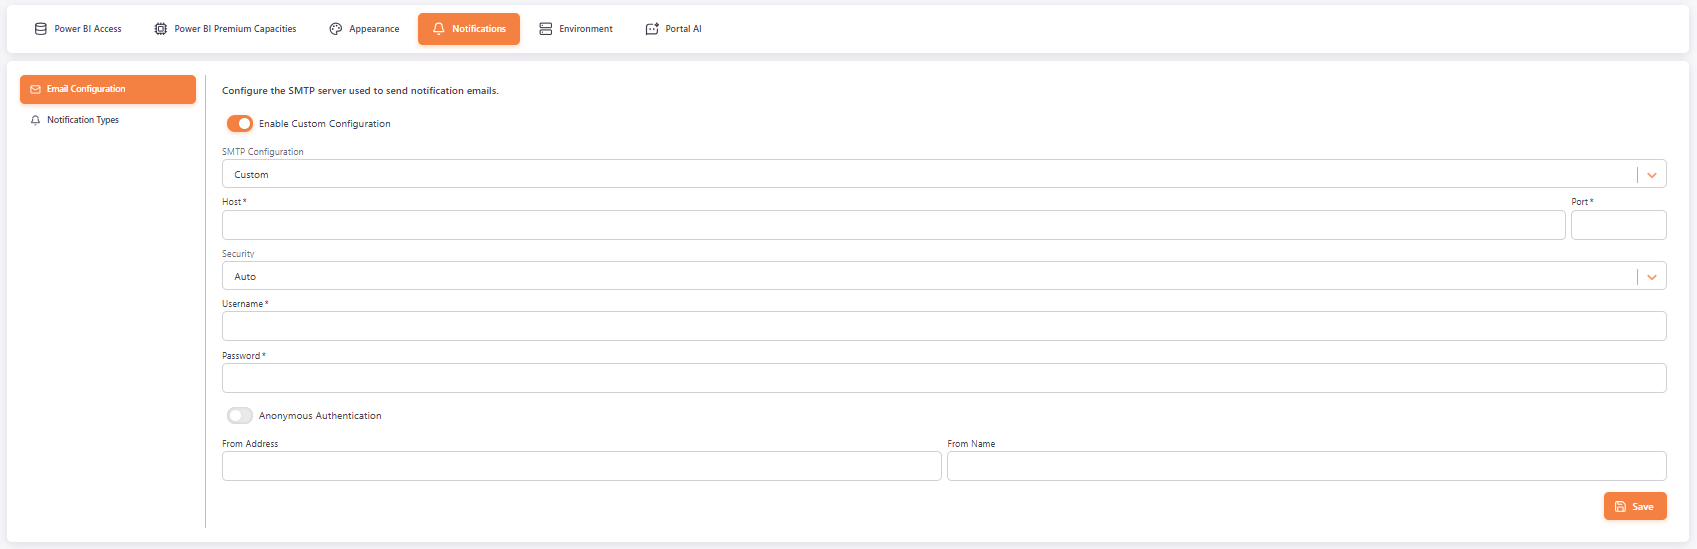
By default, PowerBI Portal sends emails with its own email settings. To send them through your own mail server, turn on Enable Custom Configuration and choose an option in SMTP Configuration. Click Save when you are done.
| SMTP Configuration | When to use it |
|---|---|
| Custom | Any SMTP server. You enter the host, port and security. |
| Office 365 | Office 365 with username and password. The host, port and security are set for you. |
| Gmail with username and password. The host, port and security are set for you. | |
| Office 365 OAuth | Office 365 with an Azure app registration. See Office 365 OAuth setup. |
| Google OAuth | Google Workspace with a service account. |
Custom⚓︎
You may need to contact your IT department to get the correct information for your SMTP server.
- Host: enter the address of the SMTP server that will handle your emails.
- Port: enter the port the SMTP server uses to send emails.
- Security: select the encryption used by your SMTP server: Auto, None, SSL/TLS, STARTTLS or TLS (When Available).
- Username: enter the account used to sign in to the SMTP server.
- Password: enter the password for the username. After you save, the password is hidden. Click Change to replace it.
- Anonymous Authentication: turn it on if your SMTP server doesn't require authentication. The username and password are then not needed.
- From Address: optional. Enter the email address visible to your recipients. Make sure the account in Username has permission to send emails on behalf of this address. If you leave it empty, the Username is used.
- From Name: optional. Enter the name visible to your recipients.
Office 365 and Google⚓︎
Enter the Username and Password of the account that sends the emails, and optionally the From Address and From Name. The host and port are set automatically (smtp.office365.com on port 587 for Office 365, and smtp.gmail.com on port 465 for Google).
Office 365 OAuth⚓︎
Fill in the following fields, which you obtain in the Office 365 OAuth setup:
- Microsoft Client ID
- Microsoft Client Secret: after you save, the secret is hidden. Click Change to replace it.
- Microsoft Tenant ID
- From Address: the mailbox that sends the emails.
- From Name: optional.
The host (smtp.office365.com), port (587) and security (STARTTLS) are set automatically.
Google OAuth⚓︎
Paste the Google service account key in Service Account JSON, and enter the mailbox that sends the emails in From Address. PowerBI Portal sends the emails as that mailbox, using domain-wide delegation. From Name is optional.
The host (smtp.gmail.com) and port (465) are set automatically.
Notification Types⚓︎
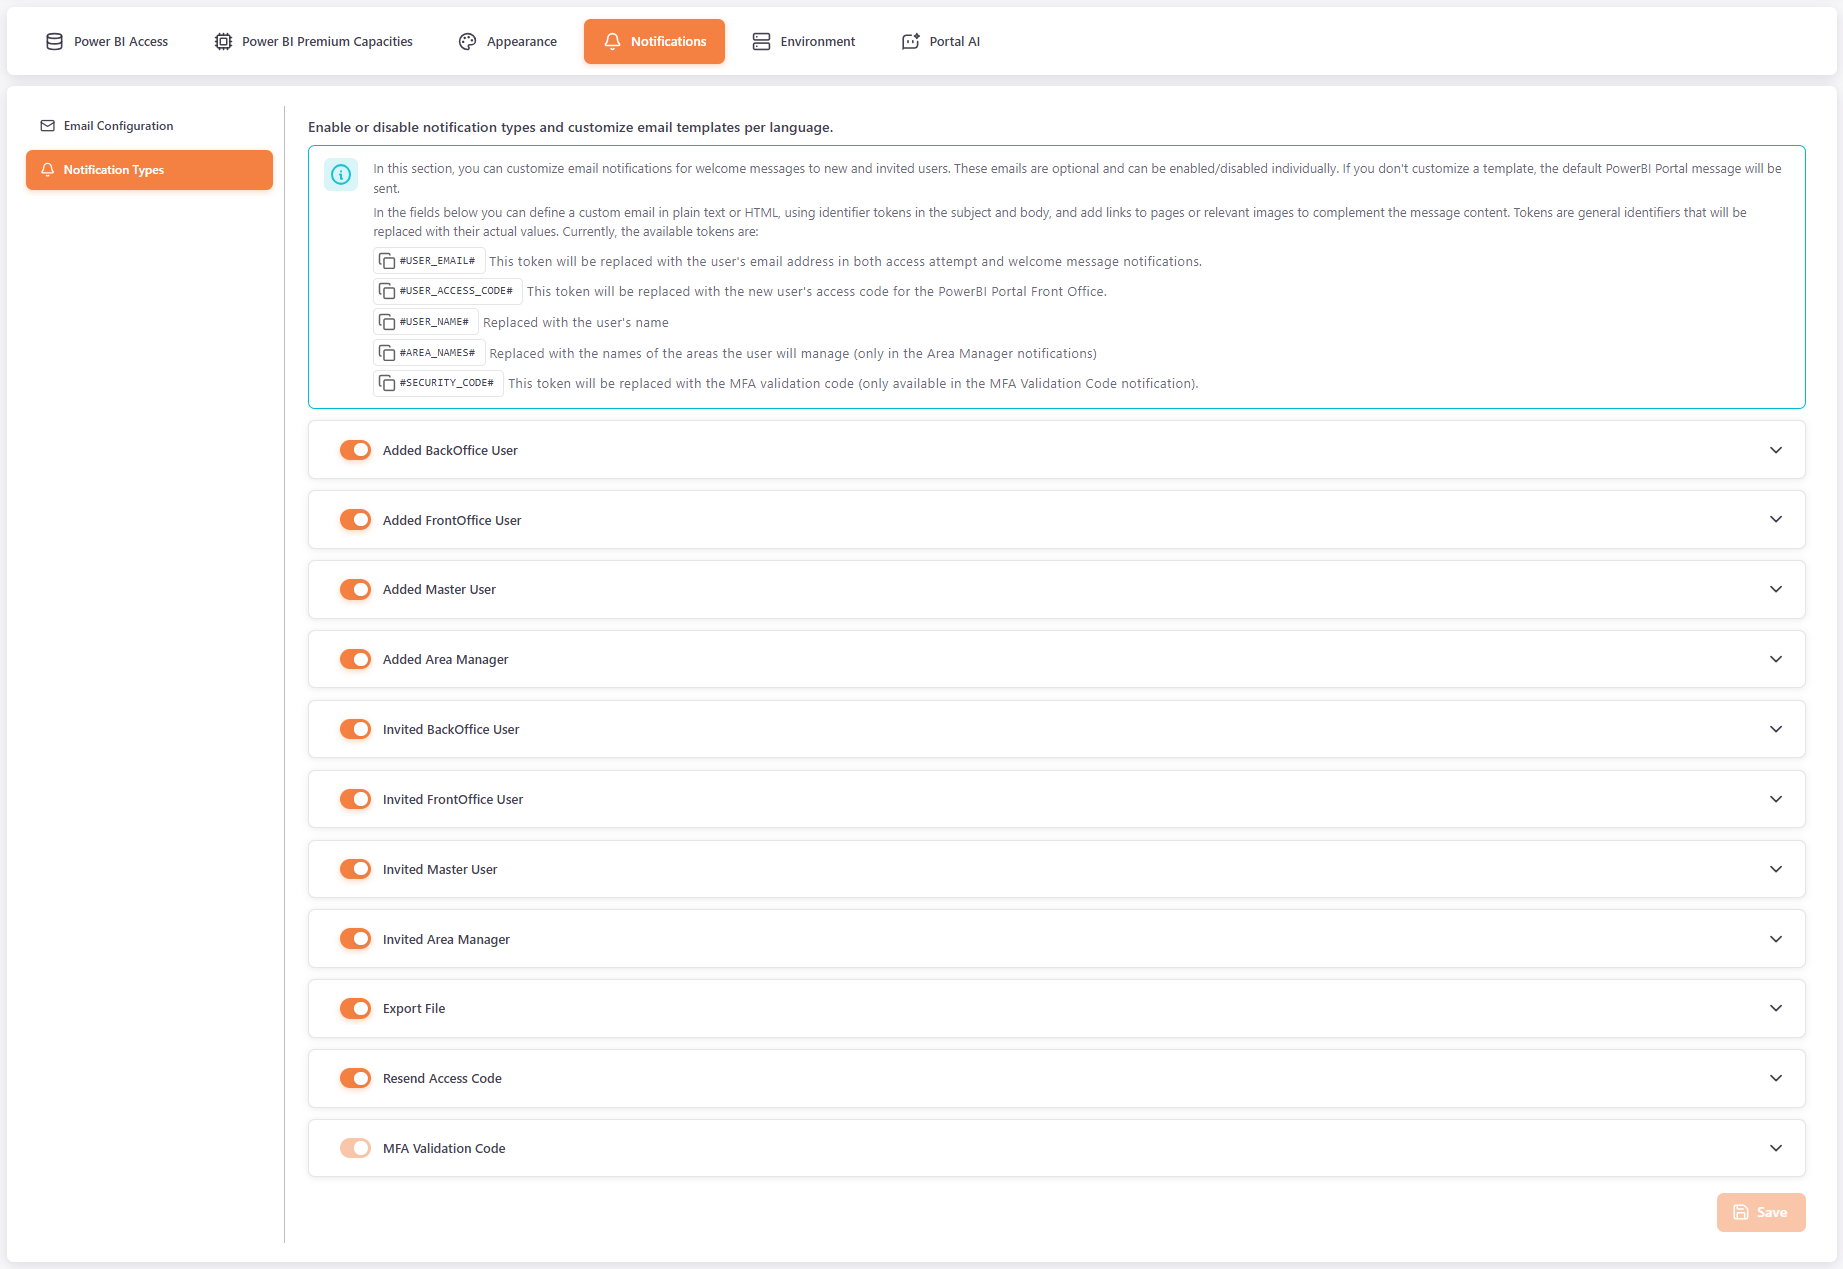
In this section, you can enable or disable each notification and customize its email for each language. If you don't customize a template, the default PowerBI Portal message is sent.
The available notifications are:
| Notification | Email sent |
|---|---|
| Added BackOffice User | To a new Backoffice user who doesn't have a PowerBI Portal account yet. |
| Added FrontOffice User | To a new Frontoffice user who doesn't have a PowerBI Portal account yet. |
| Added Master User | To a new Master user who doesn't have a PowerBI Portal account yet. |
| Invited BackOffice User | To a new Backoffice user who already has a PowerBI Portal account in another environment. |
| Invited FrontOffice User | To a new Frontoffice user who already has a PowerBI Portal account in another environment. |
| Invited Master User | To a new Master user who already has a PowerBI Portal account in another environment. |
| Added Area Manager | To a new Area Manager who doesn't have a PowerBI Portal account yet, with the names of the areas they manage. |
| Invited Area Manager | To a new Area Manager who already has a PowerBI Portal account in another environment, with the names of the areas they manage. |
| Export File | To the user who requested a report export, with the exported file. |
| Resend Access Code | When an access code is sent again to a user. |
| MFA Validation Code | The validation code used for MFA sign-in. It is always enabled and cannot be turned off. |
To customize a notification:
- Turn the switch next to the notification on or off to enable or disable it.
- Expand the notification and select a language tab (EN, PT, ES, FR, DE or CN).
- Edit the Subject and the Body. The body is a rich text editor, so you can use plain text or HTML and add links and images.
- Click Save.
To clear the custom subject and body of a notification in all languages and use the default message again, expand it, click Reset, confirm, and then click Save.
You can use the following tokens in the subject and body. Click a token in the page to copy it.
| Token | Replaced with |
|---|---|
#USER_EMAIL# |
The user's email address. |
#USER_ACCESS_CODE# |
The new user's access code for the PowerBI Portal Front Office. |
#USER_NAME# |
The user's name. |
#AREA_NAMES# |
The names of the areas the user will manage. Only available in the Added Area Manager and Invited Area Manager notifications. |
#SECURITY_CODE# |
The MFA validation code. Only available in the MFA Validation Code notification, where a custom body must include it. |
Office 365 OAuth setup⚓︎
Use this setup to send emails through Office 365 with Microsoft OAuth, without a user password.
Prerequisites⚓︎
- Microsoft 365 account (Office 365)
- Admin access to Azure Portal
- Admin access to Microsoft 365 Admin Center (for some settings)
Part 1: Create App Registration in Azure Portal⚓︎
Go to Azure Portal⚓︎
- Go to https://portal.azure.com
- Sign in with your Microsoft 365 admin account
- Search for "Azure Active Directory" or "Microsoft Entra ID" in the top search bar
- Click on it
Create App Registration⚓︎
- In the left menu, click "App registrations"
- Click "+ New registration"
- Fill in the registration form:
- Name:
Email SMTP Service(or any name you prefer) - Supported account types: Select "Accounts in this organizational directory only (Single tenant)"
- Redirect URI: Leave blank (not needed for SMTP)
- Name:
- Click "Register"
Note the Application (Client) ID and Tenant ID⚓︎
After creation, on the app overview page:
- Copy and save the Application (client) ID (GUID format)
- Copy and save the Directory (tenant) ID (GUID format)
Keep these values, you'll need them to configure PowerBI Portal.
Part 2: Create Client Secret⚓︎
Generate Client Secret⚓︎
- In your app registration, go to "Certificates & secrets" in the left menu
- Click the "Client secrets" tab
- Click "+ New client secret"
-
Fill in the details:
- Description:
SMTP Client Secret(or any description) - Expires: Choose expiration period (recommended: 24 months)
- Description:
-
Click "Add"
Save the Secret Value⚓︎
- IMMEDIATELY copy the "Value" (the secret string)
Danger
You can only see the secret value ONCE. If you lose it, you must create a new one.
- Save this secret securely.
Part 3: Configure API Permissions⚓︎
Add SMTP Permissions⚓︎
- In your app registration, go to "API permissions" in the left menu
- Click "+ Add a permission"
- Select "APIs my organization uses"
- Search for "Office 365 Exchange Online"
- Click on "Office 365 Exchange Online"
- Select "Application permissions" (NOT Delegated permissions)
- Check the box for "SMTP.SendAsApp"
- Click "Add permissions"
Grant Admin Consent⚓︎
- Still on the API permissions page
- Click "Grant admin consent for [Your Organization]"
- Click "Yes" to confirm
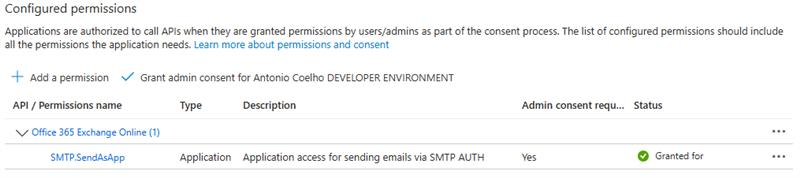
- Wait a few seconds — the status should change to a green checkmark ✓
Your permissions should now show:
Part 4: Register Service Principal in Exchange Online⚓︎
Warning
This is the most commonly missed step! You must register your Azure AD app as a Service Principal in Exchange Online.
Prepare PowerShell and Connect⚓︎
- Open PowerShell as Administrator
-
Install Exchange Online PowerShell module (if not installed):
PowerShellInstall-Module -Name ExchangeOnlineManagement -
Connect to Exchange Online:
PowerShellConnect-ExchangeOnline -UserPrincipalName admin@yourdomain.com
Register the Service Principal⚓︎
Run:
New-ServicePrincipal -AppId <Your-Application-Client-ID> -ObjectId <Your-Enterprise-Application-Object-ID>
How to get the Object ID:
- Azure Portal → Azure Active Directory → Enterprise applications → your app → Overview → "Object ID"
Assign Mailbox Permissions⚓︎
Assign FullAccess on the sender mailbox to the service principal:
Add-MailboxPermission -Identity "sender@yourdomain.com" -User <Your-Enterprise-Application-Object-ID> -AccessRights FullAccess
Optional and Cleanup Commands⚓︎
Optional — Enable SMTP AUTH for your organization (usually already enabled):
Set-TransportConfig -SmtpClientAuthenticationDisabled $false
Disconnect:
Disconnect-ExchangeOnline
Alternative via Admin Center⚓︎
- Go to https://admin.microsoft.com
- Navigate to Settings → Org settings → Modern authentication
- Ensure "Authenticated SMTP" is enabled
Part 5: Configure PowerBI Portal⚓︎
What You Need⚓︎
- Tenant ID (from Part 1)
- Client ID (from Part 1)
- Client Secret (from Part 2)
- Sender Email: The mailbox that will send emails (e.g., sender@yourdomain.com)
Enter the values in PowerBI Portal⚓︎
- Go to Settings > Notifications > Email Configuration.
- Turn on Enable Custom Configuration.
- In SMTP Configuration, select Office 365 OAuth.
- Fill in Microsoft Client ID, Microsoft Client Secret and Microsoft Tenant ID.
- In From Address, enter the sender email.
- Click Save.
Quick Test Checklist⚓︎
- App registration created in Azure AD
- Client ID noted
- Enterprise application Object ID noted (not the App registration Object ID, and different from the Client ID!)
- Tenant ID noted
- Client secret created and saved
- SMTP.SendAsApp permission added
- Admin consent granted (green checkmark)
- Service Principal registered in Exchange Online (
New-ServicePrincipal) - Mailbox permissions assigned (
Add-MailboxPermission) - SMTP AUTH enabled (usually default)
Common Issues and Solutions⚓︎
Issue: "Authentication unsuccessful" or "Service principal not found"
Solution:
- You must register the service principal in Exchange Online using the
New-ServicePrincipalcmdlet. - This is separate from the Azure AD app registration.
- Use both Application (Client) ID AND Object ID.
- Wait 15-30 minutes after registration for propagation.
Issue: "Insufficient privileges" when granting consent
Solution:
- You must be a Global Administrator or Application Administrator.
- Regular users cannot grant admin consent.
Issue: "Authentication failed" when sending
Solution:
- Verify Tenant ID, Client ID, and Client Secret are correct.
- Check that SMTP.SendAsApp permission has green checkmark (admin consent granted).
- Ensure the sender mailbox exists and SMTP AUTH is enabled.
Issue: Client secret expired
Solution:
- Go back to Azure Portal → App registrations → Your app → Certificates & secrets.
- Create a new client secret.
- In PowerBI Portal, click Change next to Microsoft Client Secret, enter the new secret and click Save.
Issue: "5.7.60 SMTP; Client does not have permissions to send as this sender"
Solution:
- The authenticated app must send as a mailbox that exists in your tenant.
- The mailbox must have SMTP AUTH enabled.
- Verify sender email matches a real mailbox.