PowerBI Portal
  • Overview
    • PowerBI Portal
  • Getting Started
    • PowerBI Portal 101
    • Features
    • Licenses
      • Trial
      • Types and Pricing
      • How to Buy
      • Support
  • Technical
    • Architecture
    • Power BI Requirements
    • Configuration Guide
      • Power BI Portal - Automatic Configuration
      • Power BI Portal - Manual Configuration
        • Step 1 - Create your own Azure AD Application
        • Step 2 - Create an Azure Group for PowerBI Portal and add the App Registration as a member
        • Step 3 - Add PowerBI Portal group to a specific security group in Power BI
        • Step 4 – Give PowerBI Portal Workspace Permission
        • Step 5 - Add PowerBI Portal as a capacity administrator in Power BI Embedded / Fabric
      • Configure Export Power BI report to file
      • Integration with Analysis Services
      • Embedded Front Office
      • On-Prem Installation
      • Capacity List
    • Privacy
    • Security
    • Changelog
  • Guides
    • How to Use
      • Adding a New User
      • Adding a New Report
      • Associating a Report to a User
      • Accessing Front Office
      • Managing Files
      • Managing Playlists
      • Leveraging Power BI Portal API
      • Accessing History
      • Conducting Audit
      • Advanced use: Tokens and RLS
    • Power BI Portal Settings
      • Power BI Access Settings
      • Power BI Embedded/Fabric Settings
      • Appearance Settings
      • Notification Settings
    • Articles
Powered by GitBook
On this page
  1. Technical
  2. Configuration Guide
  3. Power BI Portal - Manual Configuration

Step 1 - Create your own Azure AD Application

PreviousPower BI Portal - Manual ConfigurationNextStep 2 - Create an Azure Group for PowerBI Portal and add the App Registration as a member

Last updated 9 months ago

Step 1 - Create your own Azure AD Application (e.g. 'PowerBI Portal App')

, you will need to create an Azure application to allow PowerBI Portal to access your Power BI reports (in the following example the application will be named 'PowerBI Portal App' – you may use any other name).

  • Open Azure Portal and go to your Active Directory

  • Click on 'App Registration'

  • Click on 'New registration' to create a new application

Please fill in the name of the new application and create the application.

Get tenant ID and application values

To get those values, use the following steps:

  • Select Azure Active Directory.

  • From App registrations in Azure AD, select your application.

  • Copy the Directory (tenant) ID and store it in your application code.

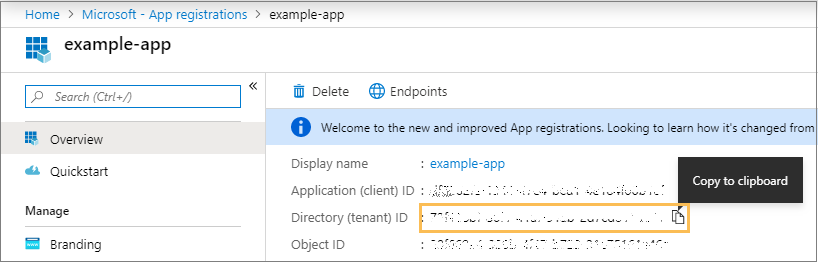
  • The directory (tenant) ID can also be found in the default directory overview page.

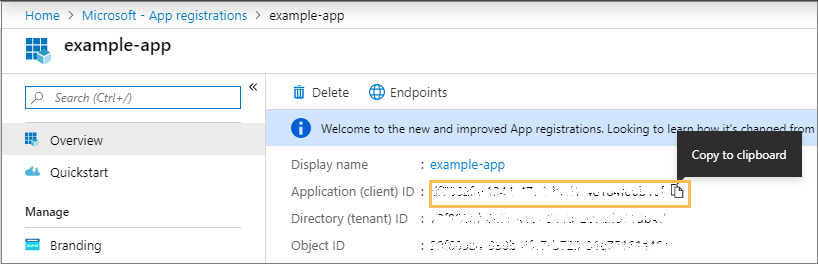
  • Copy the Application ID and store it in your application code.

Generate your application secret

You can create a new application secret, using the following steps:

  • Select Azure Active Directory.

  • From App registrations in Azure AD, select your application.

  • Select Certificates & secrets.

  • Select Client secrets -> New client secret.

  • Provide a description of the secret, and a duration. When done, select Add.

After saving the client secret, the value of the client secret is displayed. Copy this value because you won't be able to retrieve the key later. You will provide the key value with the application ID to sign in as the application. Store the key value where your application can retrieve it.

Following this, you must add at the PowerBI Portal’s Settings tab your app’s ClientID and ClientSecret. You also need to add your Azure AD Tenant domain name or Tenant Id in the “Tenant Authority” field.

For more information, please visit the Microsoft.

website
In your Azure Portal